 |
 |
|

|
||||||||||||||||||||||||||||||||||||||||||||||||||||||||||||||||||||||||||||||||||||||||||||||||||||||||||||||||||||||||||||||||||||||||||||||||||||||||||
|
||||||||||||||||||||||||||||||||||||||||||||||||||||||||||||||||||||||||||||||||||||||||||||||||||||||||||||||||||||||||||||||||||||||||||||||||||||||||||
| ▲ページトップへ | ||||||||||||||||||||||||||||||||||||||||||||||||||||||||||||||||||||||||||||||||||||||||||||||||||||||||||||||||||||||||||||||||||||||||||||||||||||||||||
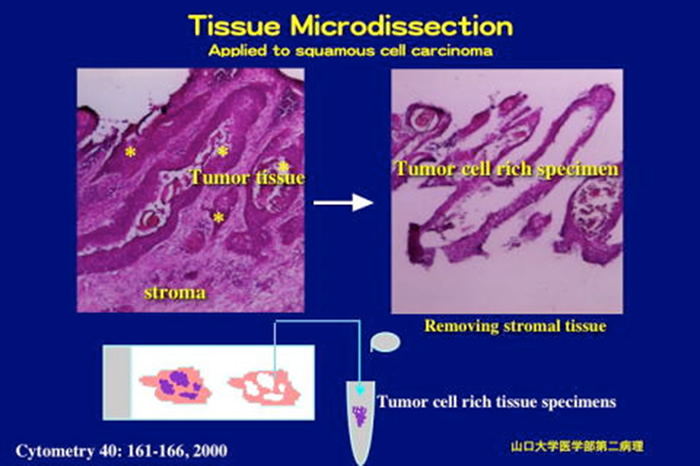
| PROTOCOL FOR MANUAL TISSUE MICRODISSECTION This method is applicable to various kinds of cancer tissues to reduce stromal tissue components from cancer specimens. Investigators should also expect to invest time initially by practicing on 10 to 20 cases to begin to feel comfortable with the technique. As they become skilled in the microdissection technology, they obtain tissue fragments rich in cancer cells in a short time. I. Preparation of frozen tissue sections 1. Set the machine (cryo-stat) for -20℃ (It takes at least a few hours to get the optimal temperature. Fortunately, the machine is usually maintained at -20C in this laboratory.) 2. Squeeze one drop of OCT compound (Tissue Tek) in bottom of mold, then put the tissue specimen in the center of it, and full the mold by OCT compound. (avoid to trapping air bubbles) *Embed fresh tissues carefully in OCT in plastic mold, taking care not to trap air bubbles surrounding the tissue. Freeze tissue by setting mold on top of liquid nitrogen until 70-80% of the block turns white and then put block on top of dry ice. The frozen blocks may be stored at minus 80°C for long-term storage. 3. Put mold in machine for 20-30 minutes. This process can be omitted, when the tissue specimens frozen by another method are used. 4. Take out the cylinder from machine and placed one drop of compound on up of fit for mold fixation, Convert the mold and put in top of the cylinder, leave it for 10 minutes in the machine. 5. Remove mold’s frame (plastic). 6. Adjust the cylinder for tissue sectioning. 7. Cut the tissue block with a razor at 5μm, and put on the slide nicety. (A tissue section is prepared for microscopic observation. When the density of cancer cells is very low, another tissue specimen should be used.) 8. Then, section the tissue block at 30μm. 9. Make totally 12-16 slides with repeat of procedures No. (7 to 8 ). 10. Leave slides in Ethanol 100% for 5minutes. 11. Stain tissue sections with HE. The lower concentration of hematoxylin and eosin may improve macromolecule recovery. 12. Arrange slides on the map-wood, and put a cover glass only on 5μm-Sections. We should evaluate the cancer cell content in the tissue section before beginning microdissection. II. Tissue microdissection - Picking up the cancer cells We perform microdissection on a standard inverted microscope (stereomicroscope) using a 27 gauge needle on a syringe as the microdissecting tool. Prepare in advance; ①1.5ml-eppendorfe tube ②70%-ethanol ③1ml-syringe with 27G needle 1. At first, spill a little of Ethanol on the slide, look for cancer cell nest, and take out that by needle of syringe, put it in the eppendorf tube (tube with 1/2 volume alcohol). While viewing the tissue through the microscope, the cell population of interest should be gently scraped with the needle. (As another way, first stromal tissues are removed from cancer tissue specimens, and cancer cell populations are left on the slide.) The dissected cells will become detached from the slide and form small dark clumps of tissue that can be collected on the needle. Several small tissue fragments can be procured simultaneously. Collection of an initial fragment on the tip of the needle will assist in procuring subsequent tissue. The tip of the needle with the procured tissue fragments should be carefully placed into a small PCR tube containing ethanol. Gentle shaking of the tube will ensure the tissue detaches from the tip of the needle. 2. Centrifuge the tube for 5minutes at 14,000rpm. 3. Remove the alcohol only, soak the tissue fragments in PBS, and centrifuge the tube for 5 minutes at 14,000rpm. 4. Remove PBS. 5. Go to the DNA extraction step (Dneasy tissue kit, QIAGEN, or SepaGene, Sankojunyaku Co., Ltd.) DNA EXTRACTION FROM MICRODISSECTED TISSUE SPECIMENS DNA extraction is performed with a DNA extraction kit according to the manufacturer’s instructions. We use two kits (products of Sanko-junyaku and Quagen) for DNA extraction. |
||||||||||||||||||||||||||||||||||||||||||||||||||||||||||||||||||||||||||||||||||||||||||||||||||||||||||||||||||||||||||||||||||||||||||||||||||||||||||
 |
||||||||||||||||||||||||||||||||||||||||||||||||||||||||||||||||||||||||||||||||||||||||||||||||||||||||||||||||||||||||||||||||||||||||||||||||||||||||||
 |
||||||||||||||||||||||||||||||||||||||||||||||||||||||||||||||||||||||||||||||||||||||||||||||||||||||||||||||||||||||||||||||||||||||||||||||||||||||||||
| ▲ページトップへ | ||||||||||||||||||||||||||||||||||||||||||||||||||||||||||||||||||||||||||||||||||||||||||||||||||||||||||||||||||||||||||||||||||||||||||||||||||||||||||
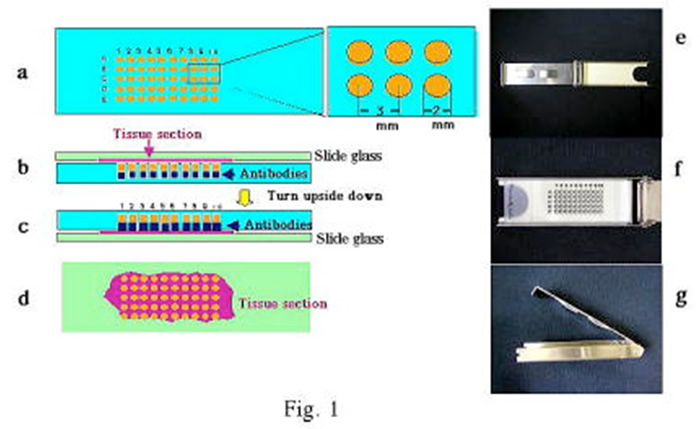
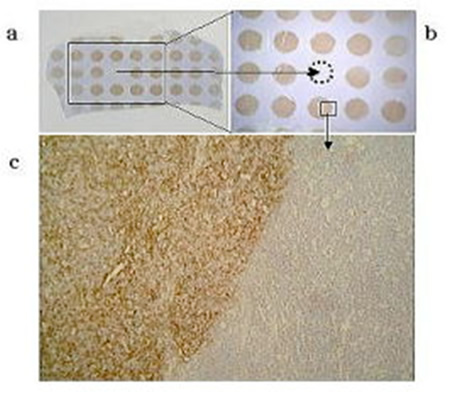
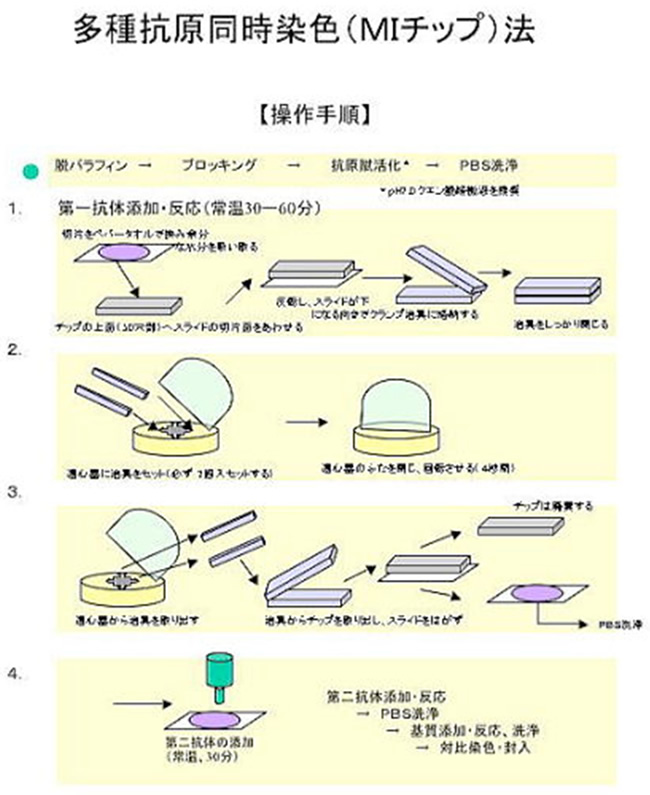
| Immunohistochemical examinations that are inevitable to a precise histopathological diagnosis in pathological laboratories are time consuming, laborious and expensive. In order to make immunohistochemical examination efficient, we have developed a novel device designated as ‘Multiplex-Immunostain Chip (MI Chip)’ for immunostaining of tissue sections and smear preparations. On a plastic plate, there are 50 small hallows which contain optimally diluted 5μl antibody solution. A tissue section is placed on the plate and fastened with clips tightly. Then, they are turned upside down, resulting in the automatic application of antibodies to the section. Since the plate allows immunohistological staining of 50 different antibodies at the most for a tissue section in a single experiment, it markedly reduces the time, effort, and expense to the immunohistochemical examination. In addition, expensive bioanalytical instruments are unnecessary for it. The chip is useful for not only histopathological examinations but also genetic studies. A number of applications of this method can be envisioned in the field of tumor diagnosis and cell biology. | ||||||||||||||||||||||||||||||||||||||||||||||||||||||||||||||||||||||||||||||||||||||||||||||||||||||||||||||||||||||||||||||||||||||||||||||||||||||||||
 |
||||||||||||||||||||||||||||||||||||||||||||||||||||||||||||||||||||||||||||||||||||||||||||||||||||||||||||||||||||||||||||||||||||||||||||||||||||||||||
 |
||||||||||||||||||||||||||||||||||||||||||||||||||||||||||||||||||||||||||||||||||||||||||||||||||||||||||||||||||||||||||||||||||||||||||||||||||||||||||
 |
||||||||||||||||||||||||||||||||||||||||||||||||||||||||||||||||||||||||||||||||||||||||||||||||||||||||||||||||||||||||||||||||||||||||||||||||||||||||||
| ▲ページトップへ | ||||||||||||||||||||||||||||||||||||||||||||||||||||||||||||||||||||||||||||||||||||||||||||||||||||||||||||||||||||||||||||||||||||||||||||||||||||||||||
| 教授あいさつ 教室の歩み スタッフ 研究紹介 業績 プロトコール集・資料 |
リンク アクセス HOME |
山口大学大学院医学系研究科分子病理学(第二病理) 〒755-8505 山口県宇部市南小串1-1-1 E-mail:pathol2@yamaguchi-u.ac.jp copyright (c) Department of Molecular Pathology Yamaguchi University Graduate School of Medicine all rights reserved. |